If you have ever had one of those shifts that seem to drag on forever, and even though it feels like it has been an hour, every time you look at the clock its only been 15 minutes? Well this weekend I had one day just like that and the next was just the opposite and I wondered why.
On Saturday I was thinking to myself "I seriously want to finish and go home" and when orders came in I did not enjoy making them, I saw them more as hindering my plans to go home, and each time I looked at that damn clock it had barely moved. So as we slowed down, I started cleaning up early, and thought "the faster I clean up the faster I finish" so I was nearly done cleaning and people walk in. Its not out of the ordinary for late customers to come in on a Saturday night so I was not surprised or angry, just a little disappointed that my luck wasn't working out for me. When the orders came in I had to pretty much undo all the cleaning I had done and make the orders. When I finished I had to pretty much start from square one. I felt like time stood still and the night would never end, but I eventually got out, and was only about five minutes late.
On Sunday I found myself thinking something more like "finally a day off tomorrow I don't care how late I get out". Every order that came in I made sure that everything was perfect, I made pretty garnishes, cooked each dish just right, not over or under done, and even when a medium rare steak came back because it was "too pink" (I think either there was a mistake in taking the order, or the customer did not understand steak temperatures) I shrugged it off. Instead of throwing it in the microwave I took the time to re-saute it to a medium well, and made it look just as nice as the first time it went out. I must say I was enjoying myself, and when I looked at the time, I thought only an hour or so had passed, but instead we were nearly closed. I thought about starting to completely break down everything and clean up, but thought I'll do it after the kitchen closes. I made the right decision, we had late customers and cleaning up would have been pointless, so once the kitchen closed, and everything was cleaned up I clocked out earlier than the previous night.
Today as I think back on the past weekend, I see why you really need to find a job you enjoy doing, time goes by much faster, and you do better work. From now on I will try to put my best foot forward as much as possible and cook with a smile, because cooking is something I enjoy doing. I think I must be extremely lucky to have found a profession that I love right off the bat.
Monday, February 28, 2011
Friday, February 25, 2011
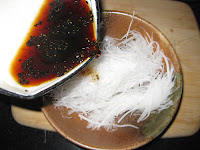
Daikon Salad
If you want a reason to practice katsuramuki, and sengiri, then this is a delicious reason to. When I practice these two techniques I always looks forward to being able to eat this salad afterward. If you don't want to go through the hassle of practicing these techniques then you can use the dressing recipe for any other salad vegetables.
You Will Need
 1. If you are using daikon leave it to soak in water for a few minutes to get rid of the strong daikon smell. (If you are using another salad this would be the time to wash it)
2. After the daikon has soaked strain the water out of the daikon, and let it dry for a few minutes. (alternatively you could use a salad spinner)
 3. While you wait for the daikon to dry off, mix the salad components together.
4. Add the dressing
 5. Mix in the dressing
6. You can either serve it immediately, or you can leave it in the refrigerator for about 30 minutes for a slightly pickled effect (it wont fully pickle)
If you want to change up the dressing at all, feel free because what tastes good to me won't always taste good to someone else (add more sugar, or less vinegar etc.). Also this dressing will keep for about 2 weeks in the refrigerator because of the high salt and acid, so if you want to make more for later use just double, triple, etc. the recipe. I found that this much of the dressing is just right for that much daikon. I hope you enjoy this!
You Will Need
- 200g (~7oz.) Daikon (or whatever you would like to use for salad don't limit yourself!)
- 30ml (2T) Rice wine vinegar (I haven't tried it with normal white vinegar but I'm sure it would come out good)
- 15ml (1T) Shoyu (Soy Sauce)
- 1t Sugar
- 1/2t Gomabura (Sesame seed oil)
- 1/2t Goma (Sesame seeds)
 1. If you are using daikon leave it to soak in water for a few minutes to get rid of the strong daikon smell. (If you are using another salad this would be the time to wash it)
2. After the daikon has soaked strain the water out of the daikon, and let it dry for a few minutes. (alternatively you could use a salad spinner)
 3. While you wait for the daikon to dry off, mix the salad components together.
4. Add the dressing

6. You can either serve it immediately, or you can leave it in the refrigerator for about 30 minutes for a slightly pickled effect (it wont fully pickle)
If you want to change up the dressing at all, feel free because what tastes good to me won't always taste good to someone else (add more sugar, or less vinegar etc.). Also this dressing will keep for about 2 weeks in the refrigerator because of the high salt and acid, so if you want to make more for later use just double, triple, etc. the recipe. I found that this much of the dressing is just right for that much daikon. I hope you enjoy this!
Wednesday, February 23, 2011
Sengiri, thousand cuts
So today as I was practicing my katsuramuki I decided to show everybody what to do with it when you finish. The most common way to use the paper thin vegetables is to cut it one more time with a technique called sengiri which means thousand cuts. This is similar to julienne in french cooking, except it is generally cut thinner (there are of course reasons to cut it more thick).
With the finished product you can do many different things, if you cut the daikon thickly you can dry it out and make a stir fry which is called sengiri-daikon (Japanese naming is interesting), for the more thinly cut daikon you can use it as daikon ootsuma which is used as a garnish or also as a "stand" for dishes like sashimi.
Today with the finished product, I made a salad (I think I might have talked about it in my video) and will show you how tomorrow!
I hope this video more enjoyable to watch than my previous ones! I just found some new video editing software which was free!!! For home use anyway. If anyone needs video editing software you can find it here at nchsoftware.
Monday, February 21, 2011
Sharpening basics!
Before you start sharpening your knives you should know a few basic things.
The Tools
Tips
In my video you can see me working the knife in sections, the tip, the mid section, and the back. If you are already experienced in sharpening knives, then you don't have to work in sections and can sharpen the whole knife in the same motion. You may also be able to hear a lot of scraping noise, depending on the grit or roughness of the whetstone there will be more or less noise, but the reason there was so much noise in my video was because I did not let my whetstone soak in water long enough (you can tell by if there are still bubbles coming out of the whetstone while you are soaking it, it should be soaked more). After I worked on both sides equally to form a burr (which is the extra metal that is left over and bends preventing a sharp edge) I "cut into the whetstone" to remove the formed burr. Lastly, sharpening knives is not as quick as this video shows! Depending on how dull your knife is it will take longer to form a burr, I try to keep my knives relatively sharp so I sharpen them about twice a week (you would be surprised how much wear and tear happens to knives in a professional kitchen) and this keeps the sharpening time for my knives relatively low.
Well I hope this helps you get your knives sharp! As with any knife please be careful when working with them, in my video you see my fingers nearly right on the blades edge, so please use extra caution because the knife is slippery from the water. Remember that as long as you are careful a sharp knife is safer than a dull knife!
The Tools
- whetstone (or something similar, I've heard of people using the rough part on the back of plates, and the flat bottom of terra cotta pots. Both I have not tried and don't recommend because if you want seriously sharp knives why not invest in a real whetstone?)
- lubricant (water or oil, oil costs money and you will need to buy more every once in awhile, so I use water)
- stand or wet towel (keeps the whetstone from slipping and helps prevent cutting yourself)
Tips
- Soak your whetstone in water for at least 10 minutes before using it.
- Keep your knife at a constant angle
- Work in sections on the knife
- Don't place pressure on the knife, let gravity do the work
- The more you sharpen your knife the more metal you are taking off so eventually (after years and years of constant use) your knife will shrink
In my video you can see me working the knife in sections, the tip, the mid section, and the back. If you are already experienced in sharpening knives, then you don't have to work in sections and can sharpen the whole knife in the same motion. You may also be able to hear a lot of scraping noise, depending on the grit or roughness of the whetstone there will be more or less noise, but the reason there was so much noise in my video was because I did not let my whetstone soak in water long enough (you can tell by if there are still bubbles coming out of the whetstone while you are soaking it, it should be soaked more). After I worked on both sides equally to form a burr (which is the extra metal that is left over and bends preventing a sharp edge) I "cut into the whetstone" to remove the formed burr. Lastly, sharpening knives is not as quick as this video shows! Depending on how dull your knife is it will take longer to form a burr, I try to keep my knives relatively sharp so I sharpen them about twice a week (you would be surprised how much wear and tear happens to knives in a professional kitchen) and this keeps the sharpening time for my knives relatively low.
Well I hope this helps you get your knives sharp! As with any knife please be careful when working with them, in my video you see my fingers nearly right on the blades edge, so please use extra caution because the knife is slippery from the water. Remember that as long as you are careful a sharp knife is safer than a dull knife!
Sunday, February 20, 2011
Private party
I have never worked for a reservation over 15 people before, until yesterday. Yesterday we were bought out for the lunch shift by a group of about 50 people for a wedding reception type event. We normally don't get bought out because we make more money on a normal day through regular business, as we have about 55 seats, and we can turn the tables at least twice, and usually 3 times on a normal lunch shift. Yesterday was a bit different though. Recently our weekend lunches have been almost dead, with some days where I can count the customers on my fingers. So my boss decided to have the big party come in, with the agreement that they spend at least $20 a head.
We had a set menu, sashimi tempura teishoku (teishoku is a set that comes with rice, pickles, miso soup, salad, and side dish). While the actual preparing of all the food was easy, finding space to put the cold foods was difficult, because our kitchen space is very limited. The tempura was made fresh, and sent out hot to each person. I was in charge plating all the sets, which means arranging the tempura, dishing out miso soup and rice, and organizing all the dishes on each tray. My job was made much easier because we only had 3 waitresses for that shift, and only two could take out food at a time, since the other was tending to the drinks so the kitchen was able to stay ahead of the wait staff. After all the food went out, there were no more orders that were going to come in so we were able to do prep work for dinner.
It was pretty hectic, but I enjoyed it. While I think being the head chef in the back of a kitchen is my ultimate goal, working in a catering or banquet business, seems like it could be fun alternative to the usual kitchen career.
Thursday, February 17, 2011
Honing your knife is not sharpening it!
You can help keep your knives in tip-top shape if you hone them regularly using a honing steel. Honing does not replace actually sharpening them though, the mechanics behind honing is it straightens out the blade that may be bent on a nearly microscopic level. It will not shave off metal (unless you have one of those new diamond honing rods, I wouldn't recommend buying one of those), and give you a new edge.
When you hone your knives you usually don't need more than 5 passes on each side to effectively bend the edge back into place. If it takes more than that for you to notice a change in cutting, then you need to sharpen it. I will have a post on sharpening your knives soon.
Also please be careful when using knives. Before I actually learned all these things, my knives were REALLY dull, and I was never worried about touching the edge. After I learned to sharpen and hone my knives, I was in the bad habit of not being careful, and cut my fingers many times.
Wednesday, February 16, 2011
Treat your knives well and they will return the favor
If you cook at home, or work in a kitchen like me, I strongly recommend having a sharp knife! Using a sharp knife is for the most part safer than a dull knife if you know what you are doing. To cut something with a dull knife you have to use a lot of strength, and if it slips and hits your hand, or someone else, you will be surprised how well that dull knife can cut. While a sharp blade can cut you without needing strength, I can tell you from experience, I would rather have a cut from a sharp knife than a dull one, the sharp knife will make a cleaner cut and won't rip and tear your skin like a dull knife, so the sharp knife wound will heal much faster, and hurt less than the dull knife wound.
When you use a sharp knife, you shouldn't have to use much strength to cut much of anything, it should glide through vegetables, and meat. If you use a sharp knife to cut your vegetables and fruits, they tend to take much longer to spoil because you are not crushing the food. Think of a bruised apple, the bruise always spoils faster than the rest of the apple right? Well a dull knife will bruise the apple along the whole cut.
With all that being said, you shouldn't go out and buy a whetstone or take your knife to a shop to spend $20 dollars to get it sharpened (unless you are really into this and want to spend $20, or even more for a whetstone). But you should know how to take care of your knives.
The first thing I always see that breaks my heart, is people placing their knives with all their silverware or other knifes, and letting the edges bend, chip, and dull. This is not only bad for the knife but unsafe for you, and whoever needs to grab silverware, or whatever you may keep with your knives. If you really have no where else to put them, there is a simple and FREE solution to this problem.Old paper towel rolls! They are durable enough to hold your knives, they easily protect both your hands, and the knifes edge from silverware. It may not look pretty, but it gets the job done!
The second thing that can easily be fixed, is cutting things on hard surfaces. I have seen glass, and marble cutting boards, and people using plates as cutting boards. While glass and marble may look pretty, wood or plastic, is much cheaper and better for your knife. If you use ceramic plates out of convenience, then think about the long run, if it is a knife you like, it will be dull in no time, and you either have to sharpen it or get it sharpened. So just break out the wood/plastic cutting boards please!
I thought about teaching how to sharpen/hone your knife in this post, but I think taking care of your knives should come first! So I shall teach honing and sharpening later, stay tuned!
Tuesday, February 15, 2011
Ichiban-dashi, the first step
If you ever want to make seriously good Japanese food, you need to make seriously good dashi. Dashi is the Japanese word for soup stock, and it always has three basic ingredients, katsuoboshi, kombu, and water. Dashi can be used in nearly every Japanese sauce, soup, and dish there is! Different ingredients can be added to alter the flavor, shiitake mushrooms, niboshi, and many different types of dried fish. The dashi I will teach you is simple, but very tasty.
You will need


**Aku is the boiled blood, and other bitter flavorings (not only from meats some vegetables make some) in small portions you can skip this step as it does not greatly change the flavor
***for those who are on a budget or don't want to waste you can save the kombu and katsuoboshi to make niban-dashi, I'll have the recipe up soon!
If you want to make a different amount, you can easily change the amounts listed, but be aware that the time it takes to bring to a boil and simmer will be different. Enjoy!!!
You will need
- 4L of water (~17 cups)
- 20g kombu (~.7 oz)
- 15g katsuobushi (~.5 oz)
- Pot capable of holding your quantity
- Bowl capable of holding your quantity
- Strainer
 | |
| 1. Rinse and soak kombu for 30minutes-6 hours* 2.Simmer kombu for 30 minutes |
 | |
| 3. Add katsuobushi and simmer for 15 minutes |
 | |
| 4. Remove the Aku** |


- 5. Strain the dashi***
**Aku is the boiled blood, and other bitter flavorings (not only from meats some vegetables make some) in small portions you can skip this step as it does not greatly change the flavor
***for those who are on a budget or don't want to waste you can save the kombu and katsuoboshi to make niban-dashi, I'll have the recipe up soon!
If you want to make a different amount, you can easily change the amounts listed, but be aware that the time it takes to bring to a boil and simmer will be different. Enjoy!!!
Kombu
 Kombu is a dried kelp that is usually farmed in the ocean. When you are using kombu it is usually very salty, so before using it is best to first lightly wipe it with a damp cloth to take off the salt residue, and any sand that may be on it.
This is just a short introduction to what kombu is and how to have it prepared for use! Recipes will be posted soon.
Monday, February 14, 2011
Katsuramuki
Katsuramuki, is a Japanese knife technique where you make thin sheets of any cylindrical object.
In the video, you see me doing a poor example of katsuramuki, and I really only realized my own mistakes after I videotaped myself, I guess this is a great way to practice and see how I can improve!
To do katsuramuki well, you need a very sharp knife with a straight edge (if it can lie flat on your cutting board) preferably but not required, and when you hold the knife and vegetable, you should have your dominant thumb on the bottom of the sheet, and your other thumb at the top, this is to help you feel how thin, or thick you are making it. Another thing you need to do is to move your knife the same time as you rotate the vegetable, it helps keep the vegetable in a nice circular shape.
With the finished product, you usually make ootsuma which is, super fine strips of the vegetable (used in lots of garnishes and for sushi), but as what I am practicing is the actual katsuramuki, I stop after making the sheets I don't like to waste, so I've tried eating it different ways, one of the best is actually the weirdest. It goes great with salsa, and i suppose you could use it like a chip for anything else too, its crunchy and healthy! If you don't like it like that, then my next suggestion would be in soups, so far I've used it in minestrone (I guess its good with tomatoes), miso soup, and curry.
Soon I hope to update this video with better quality, and a better example of this technique, and maybe an actual recipe for it, instead of just suggestions.
Sunday, February 13, 2011
Video coming soon!
I just started taking video of me making some recipes and different cutting techniques, so I will be posting them here on my blog soon. Please excuse the horrible quality and editing, I've never done this before.
Well check out my brand new Youtube channel here!
Well check out my brand new Youtube channel here!
Saturday, February 12, 2011
The vision
Most kitchens are similar in that there is a head chef who cares about the food that they serve, and of course the people under him/her, sous chef, cooks, dishwashers, etc. While you can contribute your ideas and possibly help recreate dishes, maybe even create your own special, the restaurant follows the head chefs vision.
The owners may have come up with the idea, but the head chef is the one who takes that idea and makes the food, and what is a restaurant without food? Everything that comes out of that kitchen plays to the chefs vision of their restaurant. The recipes and plating should be kept the same, unless approved by your chef.
One thing you must keep in mind as a cook is that you were hired to aid in maintaining the head chef's vision, and because it is usually the head chef who does both the hiring and firing, it would you well to follow his vision. If you think about the average cooking career, you will realize that usually a head chef does not have much time to work as the head chef. On average after the age of about 50 you are too old to keep up with the younger workers in the kitchen, and lose much of your value. If you start at age 20, as a dishwasher/kitchen helper till 25, cook till 35 (where most people get stuck), sous chef till 40, and if you are lucky you may (unlikely in most cases) become a head chef, until the very early retirement at age 50. So have respect for your head chefs they worked hard to get there, and deserve to have their vision fulfilled.
Friday, February 11, 2011
The most important person
In my job as a cook, the customer is the most important person there is. My customers are the reason I step into work everyday despite the low wages and hard working conditions. Knowing that the work I do makes people happy, is what being a cook is all about. If money is what you are after, then maybe the most important person isn't the customer, but yourself or people you have to support, and the cooking business is not for you. In this business you work hard for little pay, inflexible hours, and no vacation. Satisfaction comes not from the money in the bank, but the regular customers, the customers who just have to tell us the meal was good, and the people I talk to outside of work who say my restaurant is great. Without you this job would be worthless. Thank you to everyone who ever goes out to eat, you have made me or another cook out there happy.
Wednesday, February 9, 2011
The employee meal
The employee meal is the hardest meal for me to make. The purpose of employee meals are to feed the people who worked just as hard as you did so they can have a healthy meal, and don't have to go home late at night and prepare anything. To make a good employee meal, there are many elements involved, time, cost, and the likes and dislikes of the employees.
When you make employee meals you have a limited amount of time. From the moment you walk in to work, until the kitchen is closed, you must have the employee meal finished as the kitchen closes. This means that you have to manage time between, doing prep work, making orders, and cleaning up the kitchen. That alone is not difficult to do, the next stipulation is you must think of the food cost, you cannot use the king crab, steaks, or any other high end ingredients, unless it is a special occasion. The kind of food that goes into employee meals are the type that cannot be served to customers, not to say that they are bad parts. If you ordered a grilled salmon, you expect to be served a nice fillet, not the spine or tail. For employee meal, these parts that are often overlooked and thrown away can be used to make delicious soups, scraped clean for meat to use in other dishes, or make pseudo versions of the items on the menu. Thinking about time and cost makes this a little more challenging, but finally to make a good employee meal you have to think about what the employees like. If one person doesn't like the dish you are preparing, too bad, sometimes you just can't help it, but if half the people don't want to eat, then you have a problem. While thinking about time and cost, you also have to be able to serve something that the employees will actually eat, they may not be customers, but they are also people with different likes, dislikes, and allergies like anyone else.
This may get you thinking that employee meals are just a hassle upon the cooks, but it is the exact opposite. The employee meal is the perfect training tool for aspiring chefs. You learn to speed up the cooking process, explore your creativity, and have a sense of how much the restaurant actually pays for the food you use to feed your customers. I have been making employee meals since I started working, and while most of them do not fit the ticket of being good employee meals, they have been steadily getting better and I will share with you, my reader how to make some of these cheap, quick meals. Stay tuned for more.
 |
| The ingredients of a stock that were strained out, can be used in making an employee meal |
This may get you thinking that employee meals are just a hassle upon the cooks, but it is the exact opposite. The employee meal is the perfect training tool for aspiring chefs. You learn to speed up the cooking process, explore your creativity, and have a sense of how much the restaurant actually pays for the food you use to feed your customers. I have been making employee meals since I started working, and while most of them do not fit the ticket of being good employee meals, they have been steadily getting better and I will share with you, my reader how to make some of these cheap, quick meals. Stay tuned for more.
Monday, February 7, 2011
Niboshi
 Niboshi are dried baby sardines. They can be used for making dashi, and snacks. Because niboshi are whole fish, albeit small, they still have their innards, and heads attached. The head and stomach tend to leave a bitter fishy after taste when used in dashi so I prefer to remove the head and stomach, and use it in making furikake. Removing everything is really easy especially in small batches, here's how.
 |
| 1. Take off the head |
 | ||
| 2. Split the body in half along the spine by applying pressure to the stomach and pulling apart |
 |
| 3. Take out the stomach. |
Rush
Not an empty seat anywhere, everybody is crammed together looking at our menu. Back in the kitchen it is calm, and quiet as a kitchen can be with water running, vent fans rattling, and china clanking together as they are put away. Its too calm, as if a storm were coming. I'm nervous, and I think my butterflies are even more nervous than I am. I wait with grimace for the rest of the orders to come in, and turn away from the entrance to the kitchen for a second. "Order!" I hear and my blood gets pumping, finally the rush I've been waiting for. "One ice cream!" My heart falls, false alarm. As the kitchen helper scoops out the ice cream, "Order! Order! Order!" all three waitresses shout at once. My blood runs cold, couldn't they stack the orders a little and give me a minute or two in between? Not their problem, I understand, its mine. After the kitchen helper finishes the desert and is putting his things away, another round, "Order! Order!" Tickets are piling up faster than I can read them, if I want to quit now's the time to do it, right as the rush comes, screwing up the whole system. No, this is what I'm here for. No time to think, just do it. Hours fly by like minutes and before I know it we are closed.
Thursday, February 3, 2011
Introduction
I am an inexperienced young cook, fresh out of high school, and working my first job. I would love to show my readers what it is like to start out in a restaurant kitchen, and the life of a culinary student.
As of the start of the new year 2011, I have a few things under my belt. One year cooking in a local Japanese restaurant, one year attending culinary school, basic knife skills, basic cooking skills, and a thirst to know more. As I write this blog, I intend to give you my take on the lifestyle that I am now adopting as my own, as well as introductions to the cooking techniques that I already know, and will be learning from here on out.
Since this is my first venture into any sort of blogging or online social networking for that matter so I would love to have any feedback as to what I could do to improve my writing style, my blog itself, or even any tips on how to have a successful kitchen career.
Subscribe to:
Posts (Atom)